FlexDoc/XML - WSDLDoc (WSDL Documentation Generator)
WSDLDoc is included in FlexDoc/XML archive ready for downloads now!
- What is FlexDoc/XML WSDLDoc?
- What you can generate with it
- What is processed/documented
- Documentation Features
- Dense layouts: more information in less space
- Abundance of cross-links
- Adding extensions to local element names
- Unifying local elements by type
- List of containing elements
- Inclusion of XSD diagrams
- Table representation of complex content
- Possibility of unlimited customizations
- Getting Started
- Licensing
1. What is FlexDoc/XML WSDLDoc?
A powerful WSDL/XSD documentation generator that will help you to create a unified HTML or RTF documentation (with XSD diagrams) for any number of both WSDL and XSD (XML schema) files.It is implemented in the form of «WSDLDoc» template set for FlexDoc/XML.
- FramedDoc.tpl to generate framed HTML documentation
- SingleDoc.tpl to generate single-file HTML and RTF documentation
'templates/WSDLDoc/'
subdirectory of FlexDoc/XML archive or installation.
It is ready to use. Please read Getting Started!
2. What you can generate with it
HTML Output
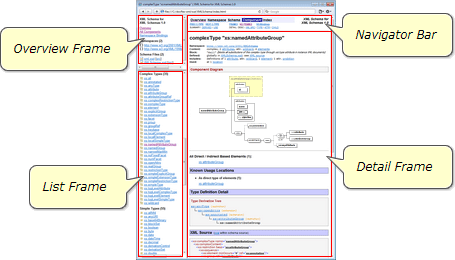
Framed HTML Documentation
Using FramedDoc.tpl main template, you can generate a multi-framed HTML documentation by any number of WSDL 1.1 / W3C XML Schema definition (XSD) files. It looks very similar to JavaDoc and provides most detailed and easily accessible information about all WSDL definitions, XML schema components as well as any interconnections between them.Here you can see some samples of such a documentation (click on a screenshot to view the real HTML):
 |
 |
The following functionality is supported:
-
Generation of file/page types:
- Basic Content Pages
- Cross-Reference Pages
- components-summary.html
- xmlns-bindings.html
- index-all.html
- index-files/index-n.html (index by letter)
- Support Files
- Javadoc-like Navigation Bar
- Switching between FRAMES / NO FRAMES views
Single-File HTML Documentation
 SingleDoc.tpl is another main template designed primarily to generate RTF documentation.
However, just by setting the output format to “HTML”, you can equally generate a single HTML file with the same content.
This is a demo documentation generated in that way (click on the screenshot to see it).
SingleDoc.tpl is another main template designed primarily to generate RTF documentation.
However, just by setting the output format to “HTML”, you can equally generate a single HTML file with the same content.
This is a demo documentation generated in that way (click on the screenshot to see it).
RTF Output
RTF Documentation
Using SingleDoc.tpl main template, you can generate a single-file RTF documentation by any number of WSDL 1.1 / W3C XML Schema definition (XSD) files. It is built of the same basic blocks as the framed HTML documentation (which are actually generated by the same subtemplates) with a few additional features.These screenshots show pages of a demo RTF documentation (click to enlarge):
 |
 |
 |
The following features/functionality are supported:
-
Main Sections (click on each link to see a corresponding screenshot):
-
Table Of Contents –
the actual table of contents is generated by MS Word according to the special
{TOC}field inserted in the RTF file and the headings of all sections (below) - Overview Summary
- Namespace Overview – generated for each namespace
- WSDL Definition Detail: Services, Bindings, Port Types, Messages
- XSD Component Detail: Elements, Complex Types, Simple Types, Element Groups, Global Attributes, Attribute Groups
- WSDL File Overview – generated for each WSDL file, may include also the full XML source of the file
- Schema Overview – generated for each XML schema
- XML Namespace Bindings – a reference table to quickly find which namespace prefixes are bound which namespace URIs according to the WSDL / schema sources (those prefixes also appear in the documentation as a part of each XML qualified name).
-
Table Of Contents –
the actual table of contents is generated by MS Word according to the special
-
Page Header/Footer
- The page header shows the information about the current section, the footer - the documentation short title and the current page number.
-
Page Number References
-
Although the generated RTF includes hyperlinks (similar to those in HTML), they have no use in the printed form.
So, many hyperlinks are supplemented with the page number of the link's target shown like:
link text
[page number]
-
Although the generated RTF includes hyperlinks (similar to those in HTML), they have no use in the printed form.
So, many hyperlinks are supplemented with the page number of the link's target shown like:
link text
-
Grouping of component details (WSDL definitions / XSD components):
- by namespaces
- by source files
- all together
-
Rendering of HTML/XHTML tags in WSDL descriptions / XSD annotations / template parameters
-
You can use XHTML tags in your WSDL descriptions and XSD annotations (see below)
to format the text, define lists and tables, include images etc.
Equally, HTML tags can be used in some titles and descriptions passed via template parameters.
Although RTF is incompatible with HTML, all of the specified HTML/XHTML markup will be rendered with the appropriate formatting features of RTF (including lists, tables and insertion of images).
-
You can use XHTML tags in your WSDL descriptions and XSD annotations (see below)
to format the text, define lists and tables, include images etc.
Equally, HTML tags can be used in some titles and descriptions passed via template parameters.
- Selectively forcing to start from a new page the documentation sections of particular types
PDF Documentation
FlexDoc/XML currently generates no PDF directly. However, you can produce quite decent PDF from RTF using some converters. For instance, the following samples have been created with MS Word 2019 from the original RTF (click on the screenshot to view/download the PDF files: 4.3 MB / 8.9 MB):


3. What is processed/documented
Any number of input WSDL/XSD files
-
Including all XML schemas embedded in WSDL (within
<wsdl:definitions>/<wsdl:types>element). - Even when the same XML schema (defining the same namespace) is embedded in multiple WSDL files documented together, all of those instances will be documented correctly. There will be no mess out of it.
All referenced WSDL/XSD files
-
Correct processing of all
<wsdl:import>,<xs:import>,<xs:include>,<xs:redefine>elements found across all involved WSDL/XSD files. - Including when one embedded XML schema imports another embedded XML schema located in the same WSDL file.
- Automatic loading and processing (i.e. inclusion in the documentation scope) all directly/indirectly referenced WSDL/XSD files.
You just need to specify only the root WSDL/XSD files of your project. Everything referenced from them will be loaded automatically!
All interconnections between WSDL/XSD
- Hyperlinks from WSDL messages to the details of XSD elements/types describing the message data.
- In XSD element/type details, the list of all WSDL definitions where they are used.
- Copy the annotations of XSD elements/types to the documentation of those WSDL messages (and even operations) where they are used.
Any XML schema design patterns
How elements are defined in XML schema is a subject of so called schema design patterns. The difference in many ways comes down to whether the local elements are used and how much. (For instance, some XML schemas define only one global element - the root one, all others are defined locally). So, a single approach to document local elements is at the same time a single way of documenting different schema design patterns. This includes:XHTML tags in your descriptions/annotations
Below is a demo of what can be achieved using XHTML markup in XML schema annotations. On the left you can see the XML source of an XML schema, whose annotations are heavily laden with XHTML markup (including insertion of images). The next is the framed HTML documentation generated by that schema (click on screenshots to see the actual HTML):
 |
 |
 |
 |
The last two screenshots show pages of the RTF documentation generated by that schema (click to enlarge). Here, you can also download a PDF converted from that RTF: HumanEvolution-xsddoc.pdf
For how to use XHTML markup, please see: FlexDoc/XML | XSDDoc | FAQ | Formatting annotations with XHTML.
In case of WSDL descriptions, it is all the same. Everything written for
<xs:documentation>
is applicable to
<wsdl:documentation>.
Support of XML Catalogs
XML catalog(s) may be used in a large WSDL/XML schema project to avoid referencing separate WSDL/XSD files from each other by direct file names. You may also want to use an XML catalog when some WSDL/XSD files involved in your project are located differently as they are specified in other WSDL/XSD files.See Also:
- FlexDoc/XML | Features | Processing of XML data sources | Support of XML catalogs
- FlexDoc/XML | Documentation | Installation / Configuration Files | XML Catalogs
- FlexDoc/XML | Documentation | Running Generator
4. Documentation Features
This section highlights some advanced features, which you rarely find in other documentation generators. That makes our tool so special!Highly navigable framed HTML documentation
The idea comes from Javadoc:
See Also: Framed HTML Documentation
Dynamic search functionality
 WSDLDoc supports the dynamic search that works similar as in the modern Javadoc.
All identifiers like WSDL/XSD definition/component names, attributes etc. are indexed.
WSDLDoc supports the dynamic search that works similar as in the modern Javadoc.
All identifiers like WSDL/XSD definition/component names, attributes etc. are indexed.
The dynamic Search-Box powered by JQuery UI can be embedded into the Navigation Bar at the top and bottom of each detail page as shown on the screenshot (click to view in full size).
The search-box is also available on the special Search Page that shows the search help and index statistics, which lists what exactly is indexed. The Search page hyperlinked from the Navigation Bar and the Overview Frame.
Dense layouts: more information in less space
 Our template technology (see FlexDoc/XML | Features)
allows for fast programming of complex table-based grid layouts.
Using it, it is possible to generate such things as shown on the left screenshot (click to enlarge).
Our template technology (see FlexDoc/XML | Features)
allows for fast programming of complex table-based grid layouts.
Using it, it is possible to generate such things as shown on the left screenshot (click to enlarge).
You may think: What's special here? Just yet another page of some documentation... But it uses three grid layouts! If that technique was not applied, the information printed on that page would occupy 2-3 pages instead!
Abundance of cross-links
When you look at a documentation generated by our tool, you can see a lot of hyperlinks. Everything seems to be a hyperlink!
See Also: FlexDoc/XML | Features | Hypertext | Cross-Reference Links
Adding extensions to local element names
Local elements are those element components that are defined locally within other XSD components (e.g. complexTypes or groups).Using local elements, you can define in an XML schema several element components with the same name but different content. That's OK to verify an XML file (for which XML schemas are typically used). But it creates a problem for documenting. Since the main purpose of the documentation is to show relations between components, all element components eventually surface globally. For instance, when you have a list of some element components that share particular properties, very likely it will include several local elements with the same name. If nothing is done about that, you will see repeating names in that list, which may look quite confusing.
We solve that problem by adding some extensions to the repeating element names, which make those elements unique. The extensions are generated according to:
- The element's possible parent in an XML document (its containing element), when there can be only one of such
- The element global type (see also below)
- The XSD component, where the element is defined
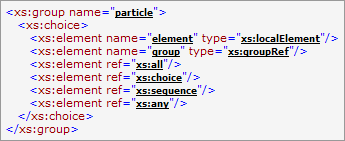
Unifying local elements by type
When a single name is used for several element components that means they share something common. Sometimes that 'common' comes down to the element type. For instance, in many XML schemas instead of defining a single global element and reference to it from many locations, multiple identical local elements are declared like this:
You've got lots of local element components that define effectively the same thing. So, instead of flooding the documentation with repeating element names, why not to document all those local elements (with the same global type) as a single one? We shall call it unified local element and its name extension (when necessary) will be just the name of that global type.
Here's how it works:
 |
 |
We think the first documentation (on the left) is much easier to understand.
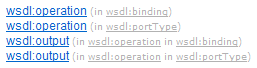
List of containing elements
When you look at details of an XSD element component (produced by any doc-generator), you will typically see which children an XML element represented by that component may have. But it is equally interesting to know the possible parents of an XML element! Specifically, the list of those XSD element components, whose content model includes the given one.Here's an example of such a list (click on the screenshot to see it within the documentation):

Inclusion of XSD diagrams
Possibility of automatic inclusion of XSD diagrams generated by DiagramKit with the support of all diagram hyperlinks. The diagrams can be generated for any XML schemas both found in XSD files and embedded in WSDL.DiagramKit is the default (native) diagramming engine of FlexDoc/XML. All diagrams on this page and in WSDLDoc examples have been generated by it.
The following screenshots show two diagrams of the same XSD component. On the left is the diagram with the element/attribute properties. On the right is the diagram without the properties. Click on the screenshots to see each diagram in full size within the corresponding documentation:") |
") |
Table representation of complex content
This is another way to represent the complex content defined by an XSD component – the most complete and easy to understand. It consists of two tables like shown on the following screenshots:Attributes


Such Table Representations can also include the full or partial description of each attribute and content element. Thereby, they can be used as a light-weight compact documentation of those attributes and elements.
- Global & Local Elements
- Complex Types
- Element / Attribute Groups
5. Possibility of unlimited customizations
Template parameters
Since all content and formatting of the generated documentation is programmed entirely in templates, the numerous options and switches, which normally control traditional documentation generators, now simply become template parameters.On the other hand, to avoid overwhelming the user with too many unimportant settings, many template parameters inherit or derive their default values from other top-level parameters. So, you actually need to change only a few of them. The entire parameter set is organized in a tree, which makes it easier to understand and navigate. That tree is displayed in the Parameter Inspector as shown below.

Alternatively, you can specify any template parameters through Java command line using -p option.
See Also:
Generator options
Generator options are more traditional things. They control particular features of the selected output generator (that is what is hardcoded in Java code).Generator options are separated from templates. They do not depend on the selected template as well as their settings are not used in templates at all. That's because templates are designed to be mostly independent of the particular output format. Only some general assumptions about the output format are accounted, for instance, whether it supports pagination and has page numbers.
Which particular generator options are available depends on the selected output format, which currently may be HTML, RTF and TXT (plain text). In the generator GUI, after you have selected the destination output format, you can click «Options» button, which will invoke Format Option Inspector. Here you can see all options available for the given format and specify them. This screenshot shows the HTML Option Inspector:

Alternatively, you can specify any generator options (along with template parameters) through Java command line using -o option.
See Also:
Using custom CSS styles
You can apply also your own CSS styles to change how the generated documentation looks.
 |
 |
{flexdoc-xml}/templates/WSDLDoc/css/azure-theme.css
How to specify it is shown in the HTML Option Inspector screenshot above. You should set:
- Output | CSS | Generate named rules = all
- Output | CSS | Generate named rules | Custom rules file = Stylesheet file path name
Note that the possibility to use any CSS stylesheets is available only under the “FlexDoc/XML SDK” license (which covers the Template Designer).
See Also:
- FlexDoc.XYZ | Documentation | Usage of CSS in generated HTML
- FlexDoc/XML | WSDLDoc | Licensing | Full Licenses | FlexDoc/XML SDK
Modifying templates with Template Designer
If template parameters and CSS styles are not enough, you can modify the templates themselves using the Template Designer:
 Template Designer is a highly sophisticated GUI used to design/edit templates.
It represents the template both in the form template components,
which it is made of, and the output those components would generate.
Template Designer is a highly sophisticated GUI used to design/edit templates.
It represents the template both in the form template components,
which it is made of, and the output those components would generate.
This screenshot shows WSDLDoc/lib/navbar.tpl template open in the Template Designer (click on the screenshot to see in full size).
That template generates the navigation bar that appears in the framed HTML documentation.
The dialog over the designer pane represents template properties. The selected tab shows the list of formatting styles used in this template.
Template Designer is covered by the separate “FlexDoc/XML SDK” license, which you need to acquire along with “FlexDoc/XML WSDLDoc” license, if you want to modify WSDLDoc templates.
See Also:
- FlexDoc/XML | Features | Template-driven architecture
- FlexDoc/XML | Documentation | Designing Templates | Running Template Designer
- FlexDoc/XML | WSDLDoc | Licensing | Full Licenses
- Licensing | Licensing of Templates | Custom Templates
6. Getting Started
You can try WSDLDoc right now, without any registration! Just download FlexDoc/XML zip-archive and follow the instructions below.By default, everything will work in demo mode. You will be able to generate a reduced documentation (including diagrams) by any your input WSDL/XSD files. If they are small enough, that will be actually the complete documentation, which you can use for free! For further details, see Licensing.
How to run WSDLDoc?
Running on Windows
- Download the FlexDoc/XML archive from the downloads page.
-
Unpack it in some directory, e.g.:
C:\flexdoc-xmlwhich we shall refer as
'{flexdoc-xml}'. -
Edit:
{flexdoc-xml}/bin/generator.batto specify the
'JAVA_HOME'variable according to the location of Java 9 (or later) installed on your system.See also: FlexDoc/XML | Overview | Technical Requirements | Where to get Java / JavaFX?
-
Run that
generator.bat. You will see the Generator Dialog like shown on this screenshot:
-
In the «Template» field, select
-
FramedDoc.tpl to generate framed HTML documentation:
{flexdoc-xml}/templates/WSDLDoc/FramedDoc.tpl -
SingleDoc.tpl to generate single-file RTF or HTML documentation:
{flexdoc-xml}/templates/WSDLDoc/SingleDoc.tpl
-
FramedDoc.tpl to generate framed HTML documentation:
-
In the «XML File(s)» field, specify one or many WSDL/XSD files, by which you want to generate the documentation.
This field must contain one or several file specifications, which may be either:
- local file pathname or pathname pattern
- URL (e.g.
http://www.w3.org/2001/XMLSchema.xsd)
- Multiple file specifications must be separated with spaces.
- When a file specification contains spaces itself, it must be enclosed in double quotes.
- You can combine any specification types together.
- The "pathname pattern" is an Ant-style pattern for local file pathnames. See: FlexDoc/XML | Documentation | Running Generator | ... | Using file pathname patterns.
- In case of URL, the generator will try to download such a file directly from the Internet (or elsewhere). This, however, can be redirected using an XML catalog.
-
In the «Output format» field, select HTML or RTF format.
RTF will work only with SingleDoc.tpl template!
-
Click «Run» button to start the generation.
If you have not installed any licenses, you will see this dialog:

Just click OK to continue.
This message notifies you, that everything will work in demo mode. It means that WSDLDoc will process all your input WSDL/XSD files, however fully document only limited number of components. If those limits are not reached, you will get the complete documentation. Otherwise, some content will be omitted and the message included saying which limits were exceeded.Once all source WSDL/XSD files have been loaded, the generator enters into the estimation phase. Lots of processing is being done during that, however, you will see only "Scanning data source, please wait..." message on the progress bar. On large input data this phase may take some time. Please wait! After that, the generator passes into the generation phase. The progress bar will show what's being generated. You can stop the generator at any time during any phase by clicking «Cancel» button.
Running on Linux
-
Unpack the downloaded FlexDoc/XML archive at some location,
which we shall designate as
'{flexdoc-xml}'. -
Go to
{flexdoc-xml}/bin/linuxdirectory. The doc-generator (Template Processor) is launched bygenerator.shshell script file.Edit
generator.shto specify the JAVA_HOME variable according to the location of Java 8.x (or later) installed on your system. Edit also the file "Permission" properties to allow it to be executed by Linux.Run that
generator.sh. You will see the Generator Dialog like shown on this screenshot:")
- Anything else is the same as in case of Windows.
Running on macOS
-
Unpack the downloaded FlexDoc/XML archive at some location (e.g. on Desktop),
which we shall designate as
'{flexdoc-xml}'. -
Go to
{flexdoc-xml}/bin/macOSdirectory (open it with the Finder).The doc-generator (Template Processor) is launched by
generator.commandshell script file.Because of security control, all macOS shell script files found in the downloaded FlexDoc/XML archive cannot be executed straight. However, that is easy to overcome as described below forWhen you rungenerator.commandfile:-
First, open
generator.commandwith TextEdit (confirm in the warning box that it is OK to open it). Then, simply resave that file via File | Save menu. With that procedure, you will signgenerator.commandas its “owner/creator”, which is a precondition to be able running it. -
On top of that, you will need also to assign
generator.commandwith the executable privilege. Run the Terminal and type in it'chmod u+x'followed by a space and the full pathname of the script file (instead of typing it, just draggenerator.commandfrom the Finder into the Terminal window). Then, press Enter.
generator.commandfrom the Finder just by clicking twice on it.generator.command, the Generator Dialog should show up like on this screenshot:")
-
First, open
- Anything else is the same as in case of Windows.
How to include XSD diagrams?
Diagrams are generated by a diagramming plugin.Diagramming plugins are particular implementations of Element Image Provider. Since FlexDoc/XML itself is mostly about data-mining in XML files and generating some human-readable texts from the found results, it has little intersection with diagramming. So, generation of any diagrams needs to be implemented separately for every particular documentation task, where they are required. Since the latter is the job of a particular template application, the diagramming plugin serves as its functional extension and both need to interact.
FlexDoc/XML currently includes a single diagramming plugin able to generate XSD diagrams: FlexDoc/XML DiagramKit.DiagramKit is the native diagramming engine of FlexDoc/XML. It works synchronously with the Template Processor and generates beautiful XSD component diagrams (with the support of all possible hyperlinks), which are immediately inserted in the documentation output produced by WSDLDoc.
All diagrams visible in all WSDLDoc examples (including on this page) have been generated by DiagramKit!
|
|
- Downloaded from https://openjfx.io and installed separately
- Included in some custom JRE specifically built for a given JavaFX application
Once you have downloaded FlexDoc/XML archive and unpacked it at some location (which we shall designate as '{flexdoc-xml}'), do the following:
-
Go to the downloads page once again and download from there (according to your OS):
In case of Windows, you should get this archive:“FlexDoc JRE (OpenJDK+JavaFX) to run FlexDoc/XML+DiagramKit”
Unpack that archive intoflexdoc-jre-17_windows.zip{flexdoc-xml}. You will have a folder:
That will be your Java to run FlexDoc/XML. You don't need to install anything else!{flexdoc-xml}/jre -
Go to:
{flexdoc-xml}/DiagramKit/Now, you can immediately run
generator.batanddesigner.batfound there to starts the Template Processor / Template Designer with DiagramKit activated as the diagramming engine. - Everything else is the same as described in How to run WSDLDoc.
See Also:
How to integrate with Ant/Maven?
A demo about that you can find in your FlexDoc/XML installation:{flexdoc-xml}/integrations/ant/
{flexdoc-xml}/integrations/maven/
{flexdoc-xml}/DiagramKit/ant/
{flexdoc-xml}/DiagramKit/maven/
Note: All demo make-files are prepared for XSDDoc.
Just replace in them 'XSDDoc' with 'WSDLDoc' to make everything work with WSDLDoc as well.
- FlexDoc/XML | Integrations | Apache Ant
- FlexDoc/XML | Integrations | Apache Maven
- FlexDoc/XML | DiagramKit | FAQ | Generator Setups | Running with Apache Ant
- FlexDoc/XML | DiagramKit | FAQ | Generator Setups | Running with Apache Maven
7. Licensing
Demo Mode
Once you have download FlexDoc/XML archive, you can run WSDLDoc immediately and see what it is. You don't need to request any trial and register anywhere!By default, everything will work in demo mode. It means that all your input WSDL/XSD files will be fully processed, however fully documented will be only limited number of components. XSD diagrams will be generated as well by any diagramming plugin you choose and as many as it's allowed by WSDLDoc demo limits. What exactly the demo limits are depends on particular main templates (as well as some metrics).
If those limits are not reached, you will get the complete documentation. Otherwise, some content will be omitted and the message included saying which limits were exceeded. Anyway, the result documentation will be minimally distorted, to allow you to evaluate how everything will look under the full license. Any documentation generated in demo mode is yours. You may use it for free as you wish.
Template Designer will work in demo mode as well. You will be able to run it, investigate some functionality, but unable to save any created/modified templates.
See Also:
Trial License
The standard package of trial licenses (see below) unlocks full functionality of WSDLDoc / DiagramKit / Template Designer. You will be able to evaluate how everything works, generate the complete documentation by all your WSDL/XSD files. It will include all possible details (according to the settings specified in template parameters). All XSD diagrams will be generated as well.But there will be some limitations:
- All generated output documents will be specifically distorted by replacing some letters with shade ('░') characters (as well as contain special messages).
- XSD diagrams will contain trial watermark.
- Any output documents or diagrams may be used only for evaluation of this software. Any other usage is prohibited!
- Trial license is limited to 30 days.
Then, you will be redirected to Try | Trial License page with “FlexDoc/XML” preselected in the «Product» field.
'flexdoc-xml.license' file, which you will receive by email.
'lib' directory (near 'flexdoc-xml.jar' file):
{flexdoc-xml}/lib/
where '{flexdoc-xml}' denotes your FlexDoc/XML installation directory.
See Also:
- Licensing | Trial License
- Licensing | Licensing of Templates | Commercial Template Applications
- Licensing | Multiple Licenses
Full Licenses
The whole functionality described on this page is covered by three different full licenses:
| License | Description |
|---|---|
| FlexDoc/XML WSDLDoc |
Unlocks all functionality implemented in WSDLDoc templates.
In particular, you will be able to:
|
| FlexDoc/XML DiagramKit | Unlocks all functionality implemented in DiagramKit. Allows you to generate XSD diagrams and automatically insert them into documentation generated by WSDLDoc (with the support of all possible diagram hyperlinks). |
| FlexDoc/XML SDK |
You need this license if you want to heavily customize the generated documentation (e.g. change some colors, fonts, layouts, look & feel, add new functionality etc).
In particular, this license covers:
Please note that neither commercial template applications themselves (e.g. WSDLDoc) nor diagramming plugins are covered by this license! |
See Also:
Which Licenses You Need - Use Cases
You don't have to purchase all full licenses listed above – only those required for your particular goal:
| Your goal | The license(s) you need |
|---|---|
You can order any combination of those licenses starting from Store page.