FlexDoc/XML - XSDDoc - FAQ

Running XSDDoc
How to run XSDDoc?
Running on Windows
- Download the FlexDoc/XML archive from the downloads page.
-
Unpack it in some directory, e.g.:
C:\flexdoc-xmlwhich we shall refer as
'{flexdoc-xml}'. -
Edit:
{flexdoc-xml}/bin/generator.batto specify the
'JAVA_HOME'variable according to the location of Java 9 (or later) installed on your system.See also: FlexDoc/XML | Overview | Technical Requirements | Where to get Java / JavaFX?
-
Run that
generator.bat. You will see the Generator Dialog like shown on this screenshot:
-
In the «Template» field, select
-
FramedDoc.tpl to generate framed HTML documentation:
{flexdoc-xml}/templates/XSDDoc/FramedDoc.tpl -
SingleDoc.tpl to generate single-file
both RTF and HTML documentation:
{flexdoc-xml}/templates/XSDDoc/SingleDoc.tpl
-
FramedDoc.tpl to generate framed HTML documentation:
-
In the «XML File(s)» field, specify one or many XSD files, by which you want to generate the documentation.
This field must contain one or several file specifications, which may be either:
- local file pathname or pathname pattern
- URL (e.g.
http://www.w3.org/2001/XMLSchema.xsd)
- Multiple file specifications must be separated with spaces.
- When a file specification contains spaces itself, it must be enclosed in double quotes.
- You can combine any specification types together.
- The "pathname pattern" is an Ant-style pattern for local file pathnames. See: FlexDoc/XML | Documentation | Running Generator | ... | Using file pathname patterns.
- In case of URL, the generator will try to download such a file directly from the Internet (or elsewhere). This, however, can be redirected using an XML catalog.
-
In the «Output format» field, select HTML or RTF format.
RTF will work only with SingleDoc.tpl template!
-
Click «Run» button to start the generation.
If you have not installed any licenses, you will see this dialog:

Just click OK to continue.
This message notifies you, that everything will work in demo mode. It means that XSDDoc will process all your input XSD files, however fully document only limited number of components. If those limits are not reached, you will get the complete documentation. Otherwise, some content will be omitted and the message included saying which limits were exceeded.
Once all source XSD files have been loaded, the generator enters into the estimation phase. Lots of processing is being done during that, however, you will see only "Scanning data source, please wait..." message on the progress bar. On large input data this phase may take some time. Please wait! After that, the generator passes into the generation phase. The progress bar will show what's being generated. You can stop the generator at any time during any phase by clicking «Cancel» button.
Running on Linux
-
Unpack the downloaded FlexDoc/XML archive at some location,
which we shall designate as
'{flexdoc-xml}'. -
Go to
{flexdoc-xml}/bin/linuxdirectory. The doc-generator (Template Processor) is launched bygenerator.shshell script file.Edit
generator.shto specify the JAVA_HOME variable according to the location of Java 8.x (or later) installed on your system. Edit also the file "Permission" properties to allow it to be executed by Linux.Run that
generator.sh. You will see the Generator Dialog like shown on this screenshot:")
- Anything else is the same as in case of Windows.
Running on macOS
-
Unpack the downloaded FlexDoc/XML archive at some location (e.g. on Desktop),
which we shall designate as
'{flexdoc-xml}'. -
Go to
{flexdoc-xml}/bin/macOSdirectory (open it with the Finder).The doc-generator (Template Processor) is launched by
generator.commandshell script file.Because of security control, all macOS shell script files found in the downloaded FlexDoc/XML archive cannot be executed straight. However, that is easy to overcome as described below forWhen you rungenerator.commandfile:-
First, open
generator.commandwith TextEdit (confirm in the warning box that it is OK to open it). Then, simply resave that file via File | Save menu. With that procedure, you will signgenerator.commandas its “owner/creator”, which is a precondition to be able running it. -
On top of that, you will need also to assign
generator.commandwith the executable privilege. Run the Terminal and type in it'chmod u+x'followed by a space and the full pathname of the script file (instead of typing it, just draggenerator.commandfrom the Finder into the Terminal window). Then, press Enter.
generator.commandfrom the Finder just by clicking twice on it.generator.command, the Generator Dialog should show up like on this screenshot:")
-
First, open
- Anything else is the same as in case of Windows.
How to generate HTML documentation?
Framed HTML
To generate multi-file framed HTML (Javadoc-like) XML Schema documentation:- Start the generator (run generator.bat / generator.sh / generator.command according to your OS). The Generator Dialog should appear.
-
In «Template» field, select FramedDoc.tpl template:
{flexdoc-xml}/templates/XSDDoc/FramedDoc.tpl. -
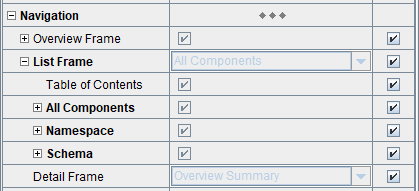
Click «Params» button, if you need to specify/edit parameters of that template.
The following are the template parameters specific to framed HTML documentation. Click on the screenshot to see the corresponding parameter description:
- In «XML File(s)» field, specify one or many input XML schema (XSD) files.
- In «Output Format» field, select HTML output format. Click «Options» button, if you need to specify/edit HTML options.
- Click «Run» button to start the generation.
Single File HTML
Sometimes you may want to generate your entire XML Schema documentation as a single HTML file (including diagrams, images and anything else). That's easy to do:- Start the generator (run generator.bat / generator.sh / generator.command according to your OS). The Generator Dialog should appear.
-
In «Template» field, select SingleDoc.tpl
template:
{flexdoc-xml}/templates/XSDDoc/SingleDoc.tpl. - Click «Params» button, if you need to specify/edit parameters of that template.
- In «XML File(s)» field, specify one or many input XML schema (XSD) files.
- In «Output Format» field, select HTML output format. Click «Options» button, if you need to specify/edit HTML options.
- Click «Run» button to start the generation.
How to generate RTF documentation?
To generate single-file RTF documentation for your XML schema(s):- Start the generator (run generator.bat). The Generator Dialog should appear.
-
In «Template» field, select SingleDoc.tpl
template:
{flexdoc-xml}/templates/XSDDoc/SingleDoc.tpl. -
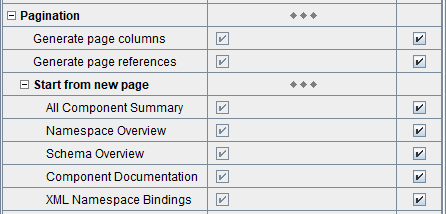
Click «Params» button, if you need to specify/edit parameters of that template.
The following are the template parameters specific to RTF documentation. Click on the screenshot to see the corresponding parameter description:
- In «XML File(s)» field, specify one or many input XML schema (XSD) files.
- In «Output Format» field, select RTF output format. Click «Options» button, if you need to specify/edit RTF options.
- Click «Run» button to start the generation.
How to include diagrams?
XSD component diagrams are generated by a special diagramming plugin. Diagrams can be automatically inserted in both HTML and RTF documentation. In case of HTML, numerous diagram hyperlinks are generated as well.
Licensing of Diagramming Plugins
Diagramming plugins are licensed separately. However, in demo mode any of them will work together with XSDDoc and generate a limited number of complete and undistorted diagrams. So, you can try how they work immediately. Just downloads FlexDoc/XML and run XSDDoc!For further details, please see: FlexDoc/XML | Features | Diagramming Plugins
FlexDoc/XML currently includes a single diagramming plugins able to generate component diagrams: FlexDoc/XML DiagramKit
How to generate diagrams with DiagramKit?
DiagramKit is the native diagramming engine of FlexDoc/XML. It works synchronously with the Template Processor and generates beautiful XSD component diagrams (with the support of all possible hyperlinks), which are immediately inserted in the documentation output produced by XSDDoc.All diagrams visible in all XSDDoc examples have been generated by DiagramKit:
 |
 |
- Downloaded from https://openjfx.io and installed separately
- Included in some custom JRE specifically built for a given JavaFX application
Once you have downloaded FlexDoc/XML archive and unpacked it at some location (which we shall designate as '{flexdoc-xml}'), do the following:
-
Go to the downloads page once again and download from there (according to your OS):
In case of Windows, you should get this archive:“FlexDoc JRE (OpenJDK+JavaFX) to run FlexDoc/XML+DiagramKit”
Unpack that archive intoflexdoc-jre-17_windows.zip{flexdoc-xml}. You will have a folder:
That will be your Java to run FlexDoc/XML. You don't need to install anything else!{flexdoc-xml}/jre -
Go to:
{flexdoc-xml}/DiagramKit/Now, you can immediately run
generator.batanddesigner.batfound there to starts the Template Processor / Template Designer with DiagramKit activated as the diagramming engine.
Related Template Parameters:
-
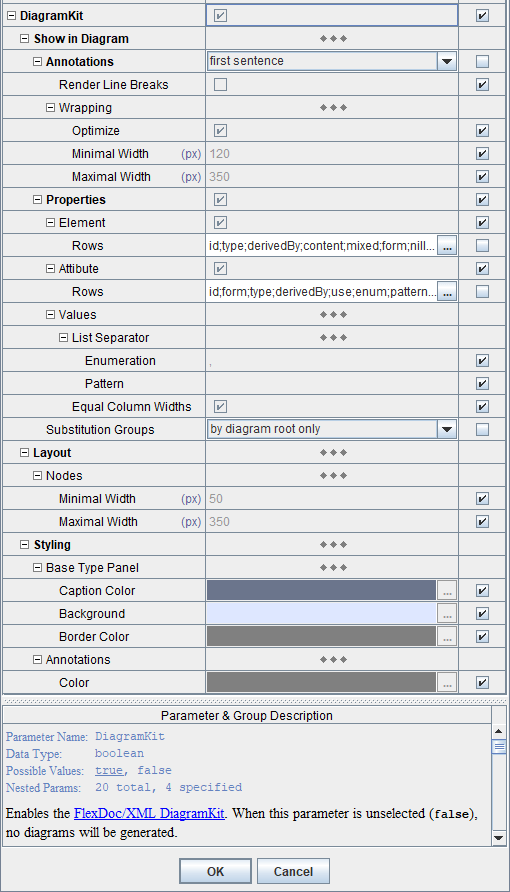
The following are the template parameters that control running of DiagramKit
(i.e. what diagrams it generates).
Note that the “DiagramKit” parameter group is enabled only when
the DiagramKit plugin is active. Click on the screenshot to see the corresponding parameter description:
See Also:
- FlexDoc/XML | DiagramKit
- FlexDoc/XML | DiagramKit | FAQ | Diagram Settings
- FlexDoc/XML | XSDDoc | Licensing | Full Licenses | FlexDoc/XML DiagramKit
How to integrate with Ant/Maven?
A demo about that you can find in your FlexDoc/XML installation:{flexdoc-xml}/integrations/ant/
{flexdoc-xml}/integrations/maven/
{flexdoc-xml}/DiagramKit/ant/
{flexdoc-xml}/DiagramKit/maven/