FlexDoc/Together - Documentation
- Installation
- Launching FlexDoc from Together IDE
- Generator Dialog
- Launching FlexDoc from Together command line
- Running stand-alone Template Designer
- Tips
Notice: All images relevant to Borland® Together® visible on FlexDoc Template Designer screenshots were provided dynamically from Borland® Together® libraries. FlexDoc/Together does not supply any of those images by itself.
1. Installation
Installation on Together 6.2 and Architect 1.x
The following applies to Together® ControlCenter™ 6.2, Together® Solo 6.2 and Together® Architect 1.x.
Let's the Together is installed at 'C:\Borland\Together6.2' directory on your system. Then, please follow these steps:
-
Create a folder:
C:\Borland\Together6.2\modules\com\togethersoft\modules\flexdoc
That is,'flexdoc'folder within'C:\Borland\Together6.2\modules\com\togethersoft\modules'which already exists and where most of the Together's stuff is located. -
From the archive you've downloaded, please copy into that folder:
lib/flexdoc-together-1_4.jar
[templates]                    - copy entire folder
As a result, at the'C:\Borland\Together6.2\modules\com\togethersoft\modules\flexdoc'you should see two items:flexdoc-together-1_4.jar [templates]
No otherflexdoc-together-xxx.jarshould be left after any previous testings! -
Place in this folder the
'flexdoc.license'file you received by e-mail (so, after that, there will be 3 items there) -
Find file:
C:\Borland\Together6.2\config\action.config
(This is a native Together's file!)Add to this file the following lines:
action.group._flexdocGroup = generic
action.group._projectDocumentationPopup.child.30 = _flexdocGroup
Save it.
FlexDoc will install itself in the “Project | Documentation” submenu. The following menu items should appear:
- “FlexDoc Generator...” to invoke the Generator Dialog
- “FlexDoc Template Designer...” to start the Template Designer
Installation on Together 6.1 and 6.0
The following applies to Together® ControlCenter™ or Solo version 6.1 or 6.0.
Let's the Together is installed at 'C:\Borland\Together6.1'
directory on your system. Then, please follow these steps:
-
Create a folder:
C:\Borland\Together6.1\modules\com\togethersoft\modules\flexdoc
That is,'flexdoc'folder within'C:\Borland\Together6.1\modules\com\togethersoft\modules'which already exists and where most of the Together's stuff is located. -
From the archive you've downloaded, please copy into that folder:
lib/flexdoc-together-1_3.jar
[templates]                    - copy entire folder
As a result, at the'C:\Borland\Together6.1\modules\com\togethersoft\modules\flexdoc'you should see two items:flexdoc-together-1_3.jar [templates]
No otherflexdoc-together-xxx.jarshould be left after any previous testings! -
Place in this folder the
'flexdoc.license'file you received by e-mail (so, after that, there will be 3 items there) -
Find file:
C:\Borland\Together6.1\config\action.config
(This is a native Together's file!)Add to this file the following lines:
action.group._flexdocGroup = generic
action.group._projectDocumentationPopup.child.30 = _flexdocGroup
Save it.
FlexDoc will install itself in the “Project | Documentation” submenu. The following menu items should appear:
- “FlexDoc Generator...” to invoke the Generator Dialog
- “FlexDoc Template Designer...” to start the Template Designer
Installation on Together 5.x
The following applies to Together® ControlCenter™ or Solo version 5.x.
Let's the Together is installed at 'C:\Together5.5' directory on your system. Then, please follow these steps:
-
Create a folder:
C:\Together5.5\modules\com\togethersoft\modules\flexdoc
That is,'flexdoc'folder within'C:\Together5.5\modules\com\togethersoft\modules'which already exists and where most of the Together's stuff is located. -
From the archive you've downloaded, please copy into that folder:
lib/flexdoc-together-1_3.jar
[templates]                    - copy entire folder
As a result, at the'C:\Together5.5\modules\com\togethersoft\modules\flexdoc'you should see two items:flexdoc-together-1_3.jar [templates]
No otherflexdoc-together-xxx.jarshould be left after any previous testings! -
Place in this folder the
'flexdoc.license'file you received by e-mail (so, after that, there will be 3 items there) -
Find file:
C:\Together5.5\config\action.config
(This is a native Together's file!)Add to this file the following lines:
action.group._flexdocGroup = generic
action.group._documentationGroup.child.10 = _flexdocGroup
Save it.
FlexDoc will install itself in the “Tools | Documentation” submenu. The following menu items should appear:
- “FlexDoc Generator...” to invoke the Generator Dialog
- “FlexDoc Template Designer...” to start the Template Designer
2. Launching FlexDoc from Together IDE
FlexDoc installs itself in the 'Project | Documentation' menu in Together 6.x or Together Architect 1.x (or 'Tools | Documentation' menu in Together 5.x):

3. Generator Dialog
The generator dialog provides a convenient GUI for specifying all necessary settings to run the FlexDoc Generator:

Selecting generation scope
If you plan to design your own templates, please note that selecting the generation scope by itself actually specifies only two internal variables:
- The root element passed to the template
- The value of the predefined template parameter
'scope'
| Scope | root element | scope-parameter |
|---|---|---|
| All | RwiModel instance representing the project model |
"all" |
| Current package | RwiPackage instance representing the current package |
"current-package" |
| Current package with subpackages | RwiPackage instance representing the current package |
"current-package-recursive" |
| Current diagram | RwiDiagram instance representing the current diagram |
"current-diagram" |
| Selected elements on current diagram |
java.util.Vector object containing RwiNode-
and RwiDiagram-instances of all selected elements
|
"selected_elements" |
Where RwiModel, RwiPackage, RwiDiagram and
RwiNode are interfaces from com.togethersoft.openapi.rwi
package of Together OpenAPI.
Setting template parameters
The “Params” button invokes the Template Parameter Inspector, like the one shown on this screenshot: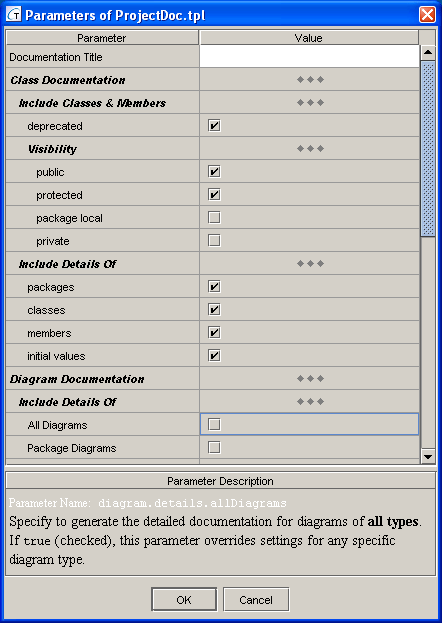
The bottom panel displays the description of the selected parameter (which is also obtained from the template). The first line of the description (the white text) shows the internal parameter name. Use this name in the -P option to specify the parameter value on the Together command line.
Changing output format options
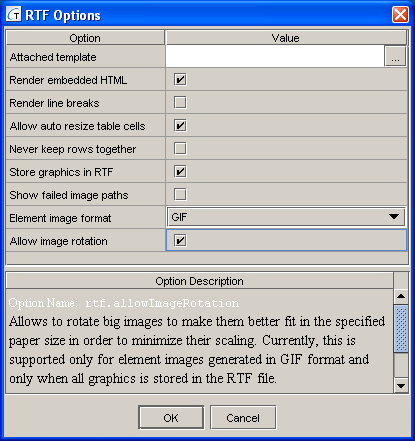
Similar to the template parameters, the “Options” button near the “Output format” combo-box invokes invokes the Option Inspector for the selected output format. The precise option list depends on a particular output format.The following screenshot shows the option inspector for the RTF output format:
Specifying output location
- Output folder
- Use this field to specify the destination directory for the generated documentation. See -d option for more details.
- Output file
- Use this field to specify the documentation main output file name. See -f option for more details.
Include diagram images
The “Include Diagrams” check-box is intended to switch whether the diagram images should be included in the generated documentation.
However, like in the case of generation scope,
the selection of this check-box by itself does nothing but specifies the value of the predefined
boolean template parameter 'diagram.images'. Further,
it is up to a template to interpret this.
The basic templates
do process this parameter as intended. To allow/suppress generation of diagram images
when FlexDoc is started from command line,
you will need to specify a -P option like the following:
-p:diagram.images=true.
4. Launching FlexDoc from Together command line
To start FlexDoc Generator from the command line without launching Together IDE, use the following command:<launcher> <flexdoc_module> <project> [options] [packagenames]where
<launcher>isTogetherCon.exeorTogether.bat<flexdoc_module>should be-script=com.togethersoft.modules.flexdoc.Generator<project>is the absolute path to your Together project[options]are the FlexDoc command line options you need[packagenames]specify packages in your project to document. If absent, the entire model will be documented. See also Generation Scope Options.
Command Line Options
The following command line options are specifically processed by the FlexDoc Generator:| -classes | -errlog | -launchviewer | -subpackages |
| -config | -exclude | -O | -template |
| -d | -f | -P | |
| -diagrams | -format | -quiet |
Please note, all options not specified directly on the command line, first, will be searched in the generator config file (see -config option) and only when not found their default values will be used.
Here are option details grouped by category:
Template Options
- -template <file>
-
Specifies the main template file to be executed by the generator. All documentation
generation is controlled by this template. The main template may call from itself
another templates (subtemplates) producing either a single output file or
multiple files (framed documentation).
The template file may be specified both with absolute or relative pathname. The relative pathname will be treated against the default template directory (specified in
flexdoc.configfile).- Examples:
-
-template C:\Together\myprojects\mytemplates\MyDoc.tpl-template ProjectDoc.tpl
- -P<parameter>=<value> or -p:<parameter>=<value>
-
Specifies the value of a template parameter.
Notes:- You can find the necessary parameter names in the Template Parameter Inspector invoked from the Generator Dialog.
-
The boolean values should be specified as "true" and "false" strings (for example,
-p:diagram.images=true). -
When the value contains spaces, enclose it in double quotes (for example,
-p:title="My Docs").
Output Options
- -format <HTML | RTF | TXT>
- Specifies the output format. By default, HTML.
- -O<option>=<value> or -o:<option>=<value>
-
Specifies the output format option.
Notes:- You can find the necessary option names in the Format Option Inspector invoked from the Generator Dialog.
-
The values of the boolean options should be specified as "true" and "false" strings
(for example,
-o:rtf.storeGraphicsInRTF=false).
- -d <directory>
-
Specifies the destination directory for the generated documentation.
This option works in conjunction with the -f option.
The documentation files are distributed in the following way:
-
In the case of a single-file documentation
- The output document is placed in the destination directory under default file name 'templatename.formatextention' (for example, in the RTF output format, template ProjectDoc.tpl will produce document 'ProjectDoc.rtf'). The -f option may override this name.
- All associated files (such as images, if not included in the document) are placed in the 'docname_files' subdirectory near the main document.
-
In the case of a framed multiple-file documentation
- By default, all generated files and subdirectories are placed in the specified destination directory. The frameset file produced by the main template is saved under the name 'index.html'.
-
If a different name 'docname' is specified with the -f option,
the frameset file is saved under this name. All other files and the subdirectory tree are moved into
'docname_files' subdirectory near the frameset file.
This makes the whole documentation to look as to consist of only two file entities, which may be easier to distribute yet during the generation, especially when different types of documentation are produced from the same project.
- Examples:
-
-template ProjectDoc.tpl -format RTF -d c:\out- generate the document file
c:\out\ProjectDoc.rtfwith the associated files subdirectoryc:\out\ProjectDoc_files\(if any) -template ProjectDoc.tpl -format HTML -d c:\out -f MyAPI- generate the document file
c:\out\MyAPI.htmlwith the associated files subdirectoryc:\out\MyAPI_files\(if any) -template ProjectDocFrames.tpl -format HTML -d c:\out- generate the framed documentation located in the directory
c:\out\with the main fileindex.html -template ProjectDocFrames.tpl -format HTML -d c:\out -f MyAPI- generate the framed documentation with the main file
c:\out\MyAPI.htmland all other files located in the directoryc:\out\MyAPI_files\
-
In the case of a single-file documentation
- -f <file>
-
Specifies the documentation output file name. This option works in conjunction with the
-d option and specifies the name of the main output file (the one associated with the main template).
Typically, it should be used to specify a pure name associated with the generated documentation (for example, 'MyAPI'). However, the pathname may also be used. In that case, it is interpreted against the initial destination directory (specified with the -d option) and may override it. If the pathname is the absolute one, the -d option is effectively ignored.
- -launchviewer[=<true | false>]
-
Tells the generator to launch a viewer for the generated documentation. Precisely, this request is passed to Together and handled by it.
- Examples:
-
-launchviewer- Do launch viewer
-launchviewer=false- Do not launch viewer, no matter what's specified in the
generator.config
Generation Scope Options
Note: Everything specified with the following options will be treated as "selected elements"
(see Selected elements generation scope). That is, the root element passed to the template
will be a java.util.Vector object containing RwiPackage-, RwiNode-
and RwiDiagram-instances of all specified packages (including those specified recursively), classes and diagrams.
The value of the predefined template parameter 'scope' will be "selected_elements".
- -subpackages <package1>:<package2>: ...
-
Includes in the generation scope the specified packages and recursively their subpackages.
Each <package> should be fully-qualified package name.
- Example:
-subpackages user_interface:Requirements.analysis
- Example:
-subpackages. It excludes those packages even if they would otherwise be included
by some previous or later -subpackages option.
- Example:
-classes problem_domain.CashSale:Requirements.analysis.Sale
The option modifier <diagramType> allows to identify the required diagram shape type (e.g. "UseCaseDiagram", "StateDiagram"). If the shape type specified, all following diagram specifications are assumed to refer to only diagrams of this type. This setting may be necessary, when in a package, some diagrams of different types share the same name.
- Examples:
-
-diagrams "Architecture View":Requirements/"Product Scanning Details"-diagrams:SequenceDiagram user_interface/"Product Scan"
Other Options
- -config <file>
-
Specify the generator config file, which may contain options written manually or using the Generator Dialog.
All options not provided directly on the command line are searched in this file.
By default, the location of the generator config file is specified in the
flexdoc.config(i.e.%TGH%/modules/com/togethersoft/modules/flexdoc/flexdoc.config). If no generator config provided, it is loaded automatically from that location (if exists). - -errlog <file>
-
Specifies the error log file used when the FlexDoc Generator is executed without Together IDE
(i.e. started from the command line).
By default, when an unexpected error/exception occurs during the generation and no GUI is enabled, all details about the error are printed to the standard console.
Using this option, you can assign a separate error log file, into which the detailed ERROR REPORT is dumped each time an error happens. Only brief messages will get on the console in that case. (See also Error Reporting for more details.)
The error log file should be specified as an absolute or relative file pathname. When the pathname points to a directory, it will be extended with the default “FlexDocXYZ.log” name (for example, setting
"-errlog ."will be interpreted as'FlexDocXYZ.log'file located in the current directory).If the error log file does not exist, it is created in the event of error. Otherwise, the ERROR REPORT is appended to the existing file. In the case of any I/O error related to the error log file itself, everything will be printed to the console (along with additional the log file error message).
- -quiet[=<true | false>]
- Suppresses displaying most of the status messages to screen.
Command Line Argument Files
To shorten/simplify list of arguments on the command line, you can specify one or more files containing all those arguments you need. Any such file should contain space- or newline-separated arguments or options written the same way as on the command line.When FlexDoc parses the command line arguments and encounters an argument beginning with the character '@', it treats the characters following it as a file name and expands the contents of that file into the argument list.
Example:
- This will run the FlexDoc Generator from Together command line:
TogetherCon.exe <flexdoc_module> <project> @argfile- The
argfilemay contain the following lines: -
    -diagrams "Architecture View":Requirements/"Product Scanning Details"

    -template ProjectDoc.tpl

    -p:diagram.images=true

    -format RTF

    -launchviewer
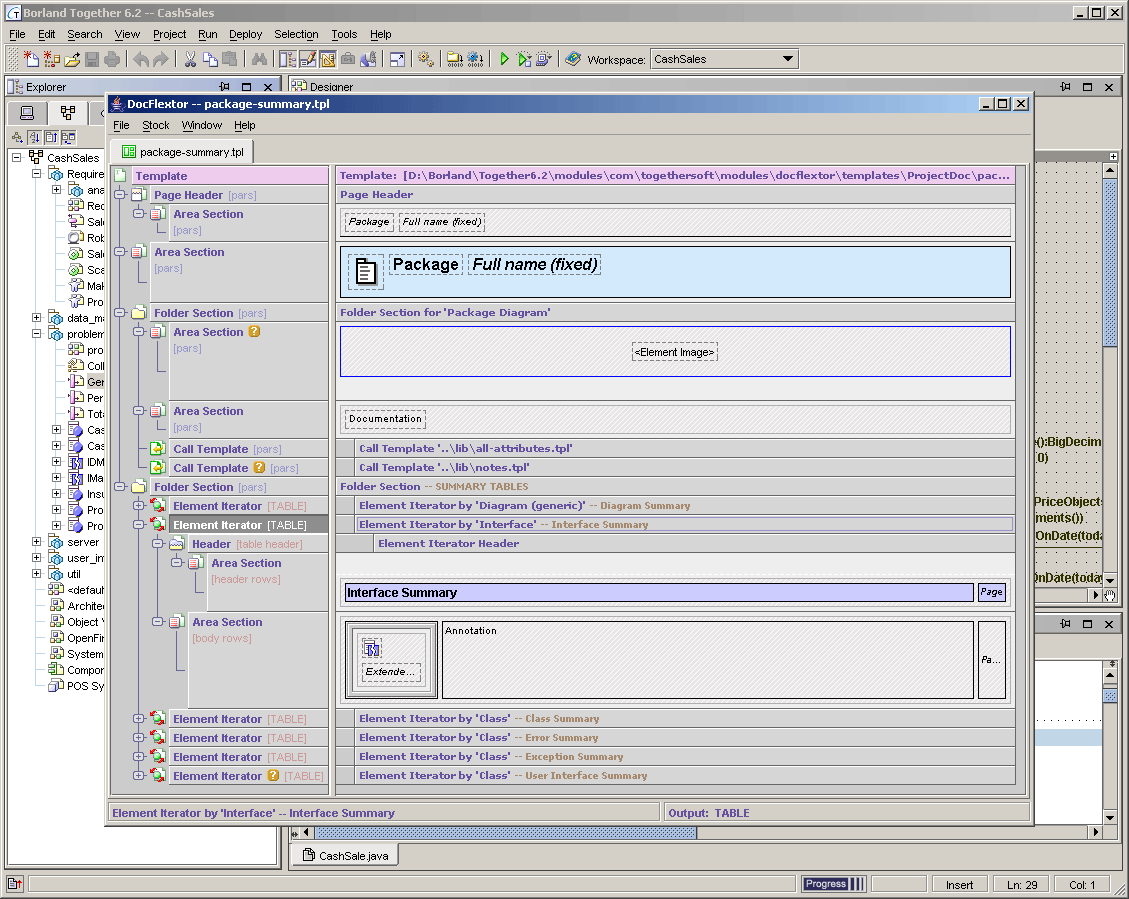
5. Running stand-alone Template Designer
The Template Designer can be started immediately as you unpack the downloaded archive. Just do the following:-
Find
designer.batand specify'JRE'variable in it according to JDK/JRE 1.4.x installed on your system.Note: You may equally use Java 1.3.x -- simply replace
'flexdoc-together-1_4.jar'with'flexdoc-together-1_3.jar'in the class path. - Place in the
lib/directory theflexdoc.licensefile you received by e-mail - Run
designer.bat
tg_openapi_stub.jar you can see in the designer.bat class path is a substitute for the Together OpenAPI Java libraries.
Actually, the Template Designer does not use any Together OpenAPI by itself, but since it uses the DSM drivers which,
in turn, contain references to the Together OpenAPI classes, the JVM cannot start the designer without at least the stub representations for some of them.
You may equally replace this stub jar-file with the original Together libraries. The following .bat commands will launch the stand-alone template designer directly from the FlexDoc installation on Together:
-
set CLASSPATH=%TGH%\lib\openapi.jar

rem under Together 6.x or Together Architect 1.x only:

set CLASSPATH=%CLASSPATH%;%TGH%\modules\com\togethersoft\modules\guiBuilderModel\guiBuilderModel.jar


%TGH%\jdk\bin\java -cp %CLASSPATH%;flexdoc-together.jar com.togethersoft.modules.flexdoc.Designer
6. Tips
Here are some tips on various topics of using FlexDoc/Together and the documentation produced with it.
Generation Phases
FlexDoc generates the whole documentation in two phases: estimation phase and generation phase.In the estimation phase, the generator quickly passes over all the source data and partially interprets the involved templates. During that, it collects the names and location of all documentation files to be created and all possible hypertarget locations within them. It also makes an estimation of the total generation time in order to graduate the progress bar.
During the estimation phase, only the message "Scanning data source, please wait..." is displayed on the Together progress bar. Please note, the estimation phase may take some time! On a very big project (and a slow computer), it may last several minutes. This does not mean, the generator hangs. Please wait!
During the generation phase, all template components are being fully interpreted and the real output generated. The progress bar is alive and shows what's being generated at the particular moment.
The version of JVM also considerable affects the whole processing time. Under JVM 1.3, the estimation phase lasts almost as long as the generation phase, whereas under JVM 1.4, it is a lot shorter. Apparently, that's because of the faster object allocation under 1.4 (although, other reasons may be in work). So, if it's possible for you, use Together 6.2 (or Architect 1.x) rather than the older Together versions!
Error Reporting
Both the FlexDoc Generator and the Template Designer may encounter various unexpected error situations. During the generation, the unexpected errors and exceptions may arise because of the following reasons:- I/O errors (e.g. invalid file pathnames, disk full, etc.)
- Template errors (when something is improperly specified in templates).
- Data source exceptions (in the case of FlexDoc/Together, these may be exceptions thrown by the Together itself).
- FlexDoc core exceptions (these may be caused by bugs not discovered and fixed yet).
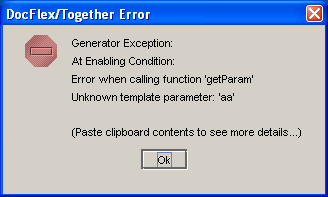
When the Generator Dialog is enabled, any error is reported via the error message dialog, like the one shown on the screenshot:
The detailed ERROR REPORT includes:
- The general info about JVM, OS, command-line arguments, etc.
- All available error messages.
- The Template Location Trace that shows which precisely template component was being interpreted when the error happened.
- The Java Exception Stack Trace (when the error was caused by some unexpected Java exception).
Updating RTF Fields
The RTF documentation generated by the provided templates heavily uses document fields (for such things like page number references, number of pages and so on).When you load the generated RTF in MS Word, to have the fields display the correct values, you will need to update them. To do this, please type: Ctrl+A, then F9.
Rotating big diagrams in RTF
FlexDoc allows to automatically rotate big diagram images placed in RTF to make them better fit in the specified paper size in order to minimize the image scaling. Rotated images appear in landscape orientation instead of portrait (without rotation).This feature is currently supported only for images generated in GIF format and only when all graphics is stored within the RTF file. By default, it is enabled.
You may disable the diagram rotation by unselecting “Allow image rotation” check-box in the RTF Options dialog
(or using '-O:rtf.allowImageRotation=false' formatting option on the Together command line).
Updating diagram frame in HTML documentation
The framed HTML documentation generated by the provided templates is displayed in several frame windows. One of them shows the diagram image, another – the detailed documentation about a class or a diagram.When you surf the documentation within the "details" frame, clicking by hyperlinks, you may need to update the displayed diagram according to the document you are currently viewing.
You may do this very quickly. Just find the big diagram icon at the top-left corner of the document and click on it.
Inserting "Mark of the Web" comment in HTML
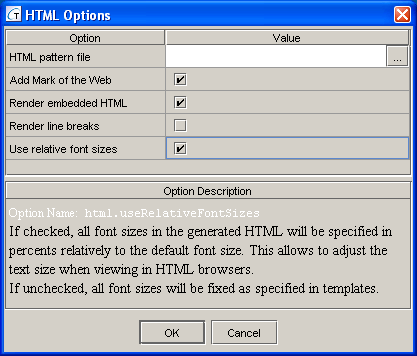
When you run generated HTML documentation from a local drive using Internet Explorer with Windows XP SP2, the Information Bar may indicate that active content (the JavaScript in the HTML) has been blocked. To avoid this problem, according to Microsoft, a “Mark of the Web” (MOTW) comment should be inserted in all generated HTML documents.Since version 1.1, FlexDoc/Together is able insert the generic MOTW automatically (see code below). This is controlled by “Add Mark of the Web” option (see HTML Options dialog).
You may also program inserting MOTW by yourself using a special HTML pattern file. To do so, you should create a separate HTML file with the following content:
-
<!DOCTYPE HTML PUBLIC "-//W3C//DTD HTML 4.0 Transitional//EN">
<!-- saved from url=(0014)about:internet -->
<HTML>
<HEAD>
<!-- flexdoc-html-head -->
</HEAD>
<BODY>
<!-- flexdoc-html-body -->
</BODY>
</HTML>
'-o:html.documentPatternFile' formatting option
on the Together command line).
FlexDoc will produce all HTML documents using the specified HTML pattern file with the
lines <!-- flexdoc-html-head --> and
<!-- flexdoc-html-body --> replaced with the actual generated output.
For more information about MOTW, please refer to Microsoft MSDN web-site: http://msdn.microsoft.com